Jiggerealla
Drilling Jig
Intro
After spending hours etching, soldering, wiring, and debugging experiencing the “joys” of building your own effect it is great to have the satisfaction of your creation coming to life. Now all there is left to do is spend more hours slaving over a box for your new effect bringing along the possibilities of scratching the surface, drill bit slipping, mis-drilled holes, bad part alignment, and other mistakes. There should be something help make this process easier. Enter the device known as the jig.
A jig is a device that allows an action to be replicated consistently and accurately. Sounds just like what we need but some jigs can be expensive and/or difficult to build. All we want to do is drill a few lousy boxes at home. Like a fairy godmother, or Tone God in this case ;-), I took some under appreciated overworked scrap pieces of material and came up with what I call Jiggerealla.
Overview
A professional style drilling jig would have some kind of clamping mechanism to hold the box in place and a set of drill guides. The drill guides would be thick walled collars with an inner diameter the size of the hole to be drilled located where it would be necessary. This would guide and hold the drill bit in the desired location preventing shifting of the bit during drilling. This style of jig would be difficult and complicated to build at home with standard materials and tools. In order to make Jiggerealla as simple as possible I made the decession not to attempt drilling the holes at full size but instead use the jig to drill pilot holes which could be drilled out to full size afterwards.
There are a number of advantages to doing this:
1. The need for complex and expensive drill guides can be eliminated.
2. Lighter materials can be used.
3. The pilot holes can be drilled out to various sizes thus if you use a different size part you don’t need a new jig.
4. Multiple hole layouts that don’t conflict with each other can now appear on a single drilling template without having to construct a new jig or drilling template.
5. Construction can be simplified.
6. Less waste material needs to be removed during the drilling process.
7. Less kick back from the drill when drilling difficult holes.
Construction
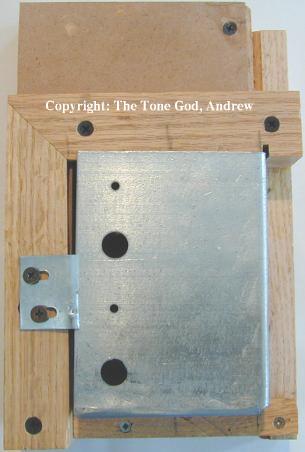
There are two components to the Jiggerealla. A base that holds the box to be drilled and a metal plate that mounts in to the base strapping the box to the base as well as serving as the drilling template. Jiggerealla is built out of common materials that should be available at just about any home hardware supply store. Time and money costs are kept down as a result. Mine is built out of some M.D.F., scrap trim, drywall screws, and the metal template was made from what I think was a joist hanger. Basically junk that I had lying around the workshop.

This is a picture of my Jiggerealla
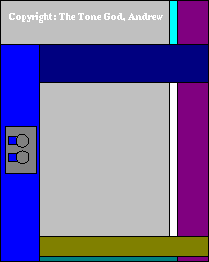
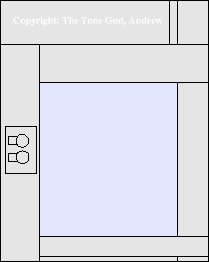
Here are some rough diagrams showing how the jig is built from different angles (Figures 1, 2, 3). The different colours represent the separate pieces that make up the jig. The exact dimension for the pieces should be determined by the size of box you wish to work with.

Figure 1

Figure 2

Figure 3
The metal plate that contains the drilling template fits into the jig through a slot on the side of the jig (Figures 3, 4, 5).

Figure 4

Figure 5

Figure 6
The metal plate (Figure 7) is relatively simple build. There are just two 90 degree bends with the longer bend extending through the slot on the side of the jig. The metal does not need to be too thick since we are are only drilling small pilot holes. Any kick back that may occur will be greatly reduce so the drilling template does not need to absorb too much force. Also there is a metal holding tab that slides on to the drilling template that when screwed down secures the drilling template to the base.

Figure 7
Depending what size boxes you typically use you could even use the same Jiggerealla for different size boxes with the use of a spacer. For example if you build a Jiggerealla for Hammond 1590BB size boxes you could put in 1590B size boxes and use a spacer to hold the box inside the jig.
Operation
You may notice that there are only two sides of the box exposed to the drilling template. In order to make the construction of Jiggerealla simple and not require much metal work only two sides are used. In order to drill out holes on both sides of the box you will need to drill corresponding holes in the drilling template. During the drilling process when it comes time to drill the holes for the other side of the box you take the box out of the jig, flip it around, reinstall it in the jig, and drill the appropriate holes.
After building the jig you need to create a drilling layout. You can use a paper template and transfer it to the drilling template but depending on how well your plate is constructed or your measuring skills you could screw up the hole positions. I prefer to drill out a box with the pilot holes in the correct position as normal, drop the box in the drilling template, then drill the holes into the drilling template through the inside of the box.
Sometimes you can fit multiple drilling layouts on one drilling template. This can be done as long as none of the different layout’s pilot holes cross over each other. I can usually get three or four different layouts on one drilling template. If no more space is available on a drilling template then you can simple make another drilling template to swap out depend on what box layout you need.
Once you have a layout you can start drilling boxes. The procedure is as follows:
Step 1. Take the box you wish to drill and place it in the base.
Step 2. Install the metal drilling template into the jig.
Step 3. Slide the holding tab over the drilling template then screw down the holding tab.
Step 4. Drill out all the holes on the top of the box.
Step 5. If there are any holes on the sides of the box flip the jig on the side and drill out the side holes.
Step 6. If there are any corresponding holes on the other sides of the box remove the box from the jig, rotate it 180 degrees, reinstall the box in to the jig (Steps 1-3), and drill the remaining holes.
Step 7. Remove the box from the jig.
Step 8. Drill out the pilot holes to the appropriate size.
Step 9. Enjoy.
Conclusion
While it may seem time consuming to build a Jiggerealla if you drill a lot of boxes then the investment of this time will pay itself back when all need to do is drop a box in to Jiggerealla and drill away without a care.
