Vanishing Point
Sequence Filter
Intro
The idea of using sequencing in effects is not new. Its also not the hard to do. There are numerous ways to do it so I thought I throw in my idea on how to do it along with some other tidbits so let take a look at the schematic (Figure 1)
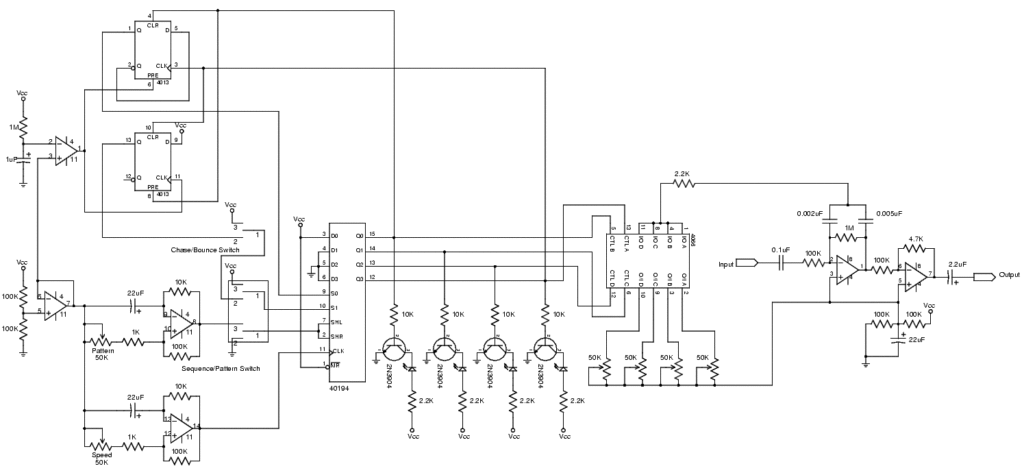
Figure 1
The schematic might a bit large to digest all at once so lets break it down and examine each piece.
Audio Section
Lets get the audio section of the circuit out of the way first since it makes up a small portion of the total circuit but its the part that makes up the overall tone of the effect. Why a filter ? I haven’t designed/built a filter before so its something new for me to try. The circuit is simple enough so I won’t get into how it works. There is information available on the operation of filters. I will cover how it works with the control logic in this context.
I choose to use a 4066 as the logic controlled switching element. For clarity sake the 4066 will be represented as four separate SPST switches in this schematic (Figure 2). One end of each switch is tied together to the filter section. The other end of the switch is connected to an individual pot. All the pots have one wiper tied together. When connected the pot will control the sweep of the filter. The control logic can switch any of the pots in and out of the circuit thereby controlling the filter sweep point. Nice, clean, simple, easy.
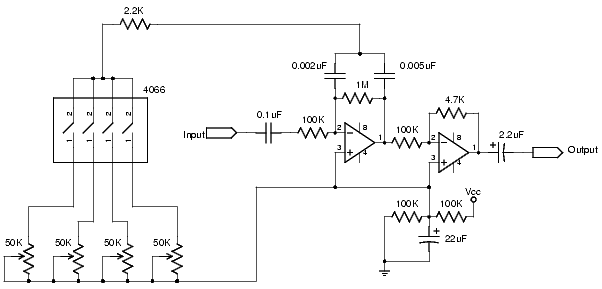
Figure 2
Control Logic
If a brain of the whole effect were to be deemed it would be the 40194. It is a 4-bit, bi-directional, serial/parallel input, parallel output shift register. Tell your friends that then you will really earn that geek reputation. 😉 What does it mean ? Without giving a whole lesson on digital logic a shift register is a logic data bucket brigade device. This is not like the analog BBDs used in time based effects. Data comes in on the input and is passed along each of the outputs. There are four individual logic values that can be stored and outputed at one time making up the 4 bits. Bi-directional means that data can be moved in either direction be it left to right or right to left. Data can also be loaded in a serial manner one bit at a time or the data can be loaded in parallel, all at once. We will take advantage of all these features that the 40194 provides.
Each of the four outputs from the 40194 (Q0-Q3) is connected to a separate switch control input of the 4066 (Figure 3). When the data is shifting around on the 40194 outputs the corresponding switch will operate connecting the sweep control pot to the audio filter section.
Transistors are tied off the 40194 outputs driving LEDs to serve as an indicator of which switch/pot is engaged.
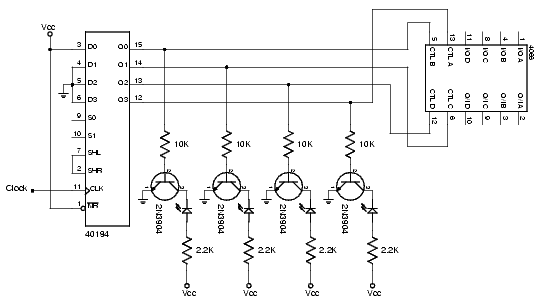
Figure 3
The output behavior of the 40194 is controlled by the S0 (Pin 9) and S1 (Pin 10) inputs. Table 1 displays what action when a clock pulse occurs the 40194 will perform based on the values of the S0 and S1 inputs.
| S0 | S1 | Result |
| 0 | 0 | Nothing. Outputs remain the same. |
| 0 | 1 | Data shifts from Left to Right (Q0 to Q3) |
| 1 | 0 | Data shifts from Right to Left (Q3 to Q0) |
| 1 | 1 | Data is loaded from the parallel inputs (D0-D3) |
Table 1
The 40194 has inputs for loading data in parallel, D0-D3. D0 is set high with the remain inputs set low. This will be an important point later.
By controlling the values of S0 and S1 we can make the 40194 do some neat things that would normally be difficult. Lets take a look at some of the modes the 40194 gives us.
Chase Mode

The chase mode is pretty simple. Most of the action takes place at the S0 input which is taken care of by a 4013 flip-flop. The flip-flop clear/reset input (pin 4) is connected to Q0 (Pin 15) of the 40194. The clock input (Pin 3) of the flip-flop is connected to Q3 (Pin 12) of the 40194. The NOT Q output (Pin 2) of the flip-flop connected to the data input (Pin 5) putting the flip-flop into toggle mode. The S1 input (Pin 10) of the 40194 is set high (Figure 4).
The flip-flop’s output Q (Pin 1) starts low. Table 1 tells us that when S0 is low and S1 is high data will be shifted from Q0 (Pin 12) to Q3 (Pin 15). The data is moves along normally until it hits the Q3 output. When Q3 goes high it clocks the flip-flop causing the flip-flop’s output Q to toggle state to high. Looking at Table 1 again when both S0 and S1 on the 40194 are high it loads the data at the D0-D3 (Pins 3-6) input.
When the data at D0-D3 is loaded Q0 on the 40194 will go high and the other outputs will go low. The high output on Q0 will cause the flip-flop to reset Q to low and the cycle begins again.
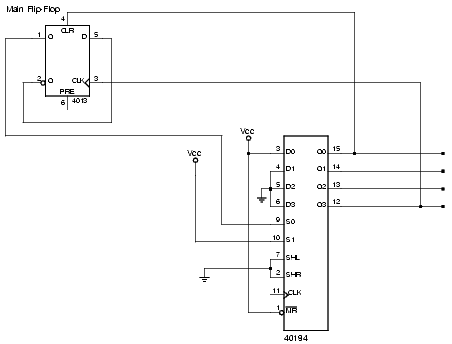
Figure 4
Bounce Mode
Using a second flip-flop to control the S1 pin can result in another interesting mode. The second flip-flop’s set/clear (pin 10) input is connected to Q0 of the 40194 which when high will set the flip-flop’s output Q (pin 13) high. The reset/preset (pin 8) pin is connected to Q3 which when high will set the flip-flop’s output Q low (Figure 5). Using these pins on the flip-flop makes sure the flip-flop’s output Q is always opposite to the main flip-flop.
Now on to the operation of the bounce mode. At the beginning it starts much like the chase mode. The main flip-flop starts in the low state and the bounce flip-flop starts in a high state. When Q3 goes high the main flip-flop is clocked high. The bounce flip-flop switches states to low. Table 1 says that data will shift from Q3 to Q0 thus the data changes direction and goes the other way. When the data reaches Q0 everything resets to the starting state and the cycle begins again.
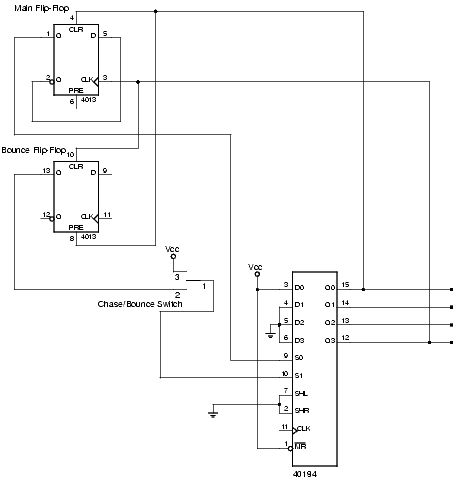
Figure 5
Pattern Mode

Another opamp is setup as second clock. This clock feeds the Shift Left (SHL, Pin 7) and Shift Right (SHR, Pin 2) inputs of the 40194 (Figure 6). These pins control what new data will appear on the output depending on the direction the 40194 is shifting in. When shifting left the data at the SHL input will appear at the Q0 output. When shifting right the data at the SHR pin will appear at the Q3 output. As the main clock that is controlling the speed of the effect causes the data to shift the state of the second clock that is feeding the SHL and SHR pins is loaded into the corresponding output depend on what direction mode the 40194 is running in.
Since both clocks can be set at different rates the potential of both inputs being at certain states can be adjusted. By controlling the speed of the two clocks various patterns can be generated from staircases to near randomness. It should be pointed out that the 40194 can bring multiple data outputs high and the switches in the 4066 operate independently so more then one pot can be engaged thus wiring the pots in parallel resulting in a new value for even more variation in sound.
If the pattern mode is used with the bounce mode engaged there is the potential of the circuit “locking up” and stop functioning until it is reseted. The Sequence/Pattern switch forces the effect into Chase mode regardless of what the Chase/Bounce switch is set at thus minimizing this possibility.
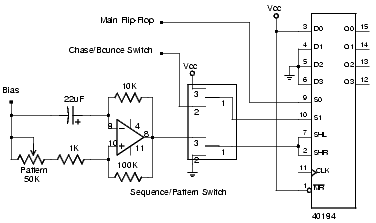
Figure 6
Bias Point
Opamps are used for other functions in the Vanishing Point effect besides audio. One opamp is wired as a buffer with a resistor diver network on the input providing 1/2 V+ voltage (Figure 7). The output of the opamp gives 1/2 V+ to be used as the bias voltage in other parts of the circuit. If anything connected to the output causes a change of voltage the opamp will adjust to make sure the voltage level is maintained. The opamp is working as simple voltage regulator.
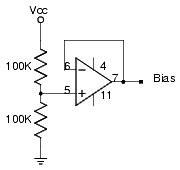
Figure 7
Power Up Logic
One of the problems with logic gates is we can never be sure of what state the various logic gates will be in at power up. The “Lost In State” article addressed this issue in common logic controlled effects by using a one shot timer made up of a simple R/C circuit to send a pulse to the needed gates thus setting the everything to the desired state. The same approach is taken with the Vanishing Point logic but instead of using gate for the pulse another opamp is used.
Opamps can be used as comparators. In this mode of operation the voltages on the two inputs are monitored. When the voltage on the non-inverting input raises above the inverting input the output of the opamp goes high. Using the R/C timer circuit hooked up to the inverting input the voltage will rise as soon as the effect is powered on. The non-inverting input is set to the bias point (1/2 V+). The opamp output will remain high until the voltage of the R/C circuit goes above the bias voltage at which point the opamp output will go low thus completing the pulse.
To make sure the effect starts up in a appropriate state the data outputs have to set to a known good condition. Taking advantage of the load function that occurs when both S0 and S1 on the 40194 are high the output state can be set. The problem is that one or both mode control pins of the 40194 are controlled buy flip-flops which are set to be always opposite of each other making the task of setting both flip-flops high for the duration of a clock cycle difficult. By using the extra inputs of the flip-flops both flip-flop outputs can be forced high for the duration of the power up cycle (Figure 8).
The pulse circuit is connected to the Preset/Set input of the main flip-flip (Pin 6). With the Preset/Set input of the main flip-flop high the output is set high.
If the effect is set in Chase mode the S1 input is already set high but if the effect is in Bounce mode some more work is needed. The same output pulse from the opamp is sent to the clock input (pin 11) of the bounce flip-flop. This will cause the flip-flop to load the state at the data input (pin 9) which is set to high. This will set the output of the bounce flip-flop to high.
Both flip-flop output are kept high for the course of the power up which should be longer then it takes for a clock cycle to complete.
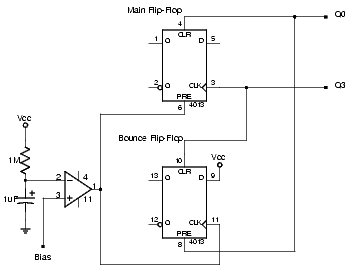
Figure 8
Clocks
As stated above when the voltage of inverting input goes higher then the non-inverting input the opamp output will go low. The clocks used in this circuit are made from an opamps using this function (Figure 9).
The output of the opamp is fed back to each of it’s inputs through 100K resistors. The voltage on the non-inverting input (+) is set using a pot that allows for the voltage at the non-inverting input to be adjusted. On the inverting input (-) there is a capacitor. This capacitor charges/discharges depending on which part of clock cycle its on. Eventually the capacitor’s voltage will pass the voltage on the non-inverting input. When this happens the output of the opamp goes will change.
The clock cycle operation is as follows. With the capacitor uncharged the voltage at the inverting input with be lower then the non-inverting input. This sets the output of the opamp high. The high output sets the voltage on the non-inverting input, which can be adjusted using the pot, and starts to charge the capacitor through the feedback resistor. When the capacitor charges past the voltage on the non-inverting input the output of the opamp will go low. With the output low the voltage at the non-inverting input gets lower while the capacitor proceeds to discharge until the voltage drops below the voltage on the non-inverting input causing the output to go high again. The cycle continues providing the clock pulse for the circuit.
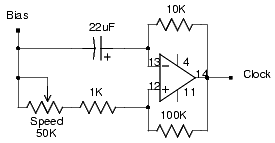
Figure 9
Modifications
Lots of modifications of this circuit are possible. Here are a few that came off the top of my head.
- – Add a volume and/or tone control to the output.
- – A range pot that would go in series with all of the sweep pots to control the range the effect is swept in.
- – Effects other then filtering can be used in place of the audio section. Phaser, vibrato, gain/distortion, and even tremolo audio circuits could be used. Tweak your phaser/vibrato/tremolo sweep to exactly what you want.
- – Put switches to disconnect each of the sweep pots for staggard sequencing or have each switch wiring in the previous pot so you have a smoother switching cycle.
- – Use a foot switch to clock the effect. Operate it like a set of pre-positioned wahs.
- – Expand the number of sweep pots by adding pots, extra 4066s, and 40194s. Wire the 40194s so they cascade. Potentially unlimited expansion.
- – Add a more random-ish mode by putting different clock signals to each of the data load pins of the 40194.
- – Have a footswitch that when operated would run through each of the pots and stop at the last pot. This would repeated when the footswitch was operated again.
- – Control more then one parameter by wiring multiple 4066 switches to operate off of the same output signal. Combine with the stepping footswitch modification would allow you to have presets that you can step through.
- – Use an optocoupler to control the sweep of the filter using the sweep pots to control the intensity of the light source. Provides isolation between the audio and switching section as well as using the LDR’s slow response to smoothen out the jumps between different sweep settings.
- – Put an envelope follower in the circuit to control the optocoupler light source and use the range pot mod controlled by the LDR. It will work like an envelope filter with different ranges set.
- – If using the above optocoupler mod add an external control jack to an existing effect then interface to it. You can then remove the switcher to return to normal operation.
- – Add an external expression pedal to control the effect more. Speed or use the range pot mod then control that.
PCB/Layout/Schematic are available in the download area. Enjoy.